|
| Email me |
|---|

|
|
| Introduction (How I setup a free web server) |
|---|
|
The free aspect is a little misleading. There are four costs:
- Time isn't a limitless resource, and this may take a lot of time - however this should be hobby time.
- Your'll need some hardware - an old PC and a new modem.
- Your'll need some kind of "Always-on" internet connection such as broadband (but I'd have it even if I didn't run a web-server).
- Your'll have the electricity cost of leaving the server on 24-7 - (couple of quid a week).
The Plan
- Get a Broadband connection working.
- Add a linux box to the network
- Start the webserver.
- Get website accessible from the world wide web.
- Secure the network with a firewall.
- Reduce the noise of the webserver.
- Increase the power of the webserver.
|
| Get a Broadband connection working |
|---|
First purchase (March 2003)
I decided I wanted broadband and looked for the cheapest possible "always-on" price, NTL did one for Ł15, but of course they didn't serve my area so I had to get BT Broadband for Ł 27 per month. The extra money buys more upload speed. Upload speed is important when running a server as it governs the speed of the site.
Do some reasearch before signing up:
It took 9 days for BT to make the telephone line DSL compatible (but no engineer needs to come) and then they sent me an information pack which contains your username.
Second purchase (March 2003)
Broadband is ADSL technology and you need a ADSL modem. Instead of getting the one BT was trying to sell me, I wanted a network friendly one so I searched ebay and found:
|
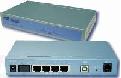
- "ADSL Modem Router with 4-Ports 10/100 Switch and Firewall with 1 Free Micro Filter" (Ł70 including packaging)
- 2x5m RJ45 network cable
|
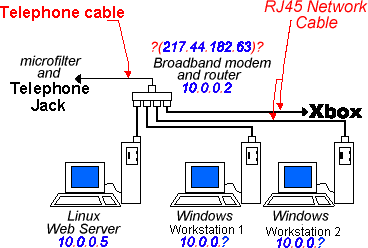
This little box is:
- A ADSL modem - Enabling me to communicate with my broadband provider.
- A router - Used to connect different networks together. It is a bridge between my small LAN home-network and my broadband providers WAN network that will give me access to the internet. My local LAN traffic will stay one side of the router whereas internet traffic will pass through the router.
- A switch - Used to get IP packets from one machine in the network to another machine in the network. Packets are not broadcast across all cables connected to the switch and so a switch prevents flooding the whole ethernet, unlike a hub. You can think of a hub as a box which connects all the cables together. Any packet from any host is broadcast across all cables connected to the hub.
- A few other things - The little box has an enormously complex interface which reveals it is a DCHP server and many other things that I don't yet understand. e.g. it supports NAT, Virtual Servers, and Bridge Filtering.
Having a modem/router/switch in one is cheaper, helps to minimise clutter and seems to be a simple solution to getting more that one computer connected to the web.
To read about configuring the broadband internet connection see my configuration diary.
|
| Add a linux box to the network |
|---|
The webserver Hardware
|
The webserver can be an old computer not much good at playing the latest games. I chose to make my 8 year old Pentium 1 a webserver. It only has a 166MHz processor but handles things fine.
My network is now 2 fast windows machines (good for network games), a Xbox (with Xbox live) and a linux box as a webserver.
|
|
Linux Install
Since the rest of the adventure is with software rather than hardware, linux is the free and hip way to go about it. Get a copy of Linux (whatever distro, but I got the newest and most standard: Redhat version 8). You can download it and burn it onto CD, buy it from ebay or go to "PC World".
The installation procedure is important and you need to be carefull what packages you install. You want to install the packages related to servers, don't assume anything is installed by default. If you can see these, make sure their ticked to be installed:
- Applications - Databases - Postgresql-perl
- Development - languages - php
- Development - Languages - php-pqsql
- System Environment - Daemons - mode_php
- System Environment - Daemons - wu_ftpd
Boot up the Linux Box
login as root. Oh my God, linux is slow, perhaps I should have installed an older version? No, the plan for this machine is to sit quietly in the corner, it doesn't have to have a responsive user interface as long as it can serve web pages fast. After the initial configuration, we won't have to touch it, we can even take away it's monitor to save space! Setting a low screen resolution and installing the minimum needed services is a good idea anyway.
Check:
- The internet works - load a page in the broswer
- The network works - ping an existing computer and use that computer to ping the linux box.
- You can access the router - go to 10.0.0.2 in a browser.
Understanding the Linux file organisation
There are two big differences between the way windows and linux organise files.
- In Linux there is a root to the directory tree, this is not the case in windows where one often has many drives (C:, A: etc).
- Windows has the concept of "Program directories" where all a programs files start from one place. In Linux, programs put their documentation into '/usr/share/doc/program_name', man pages into '/usr/share/man/ ', info pages into '/usr/share/info'. That is they are merged with the system hierarchy.
The linux directory convention:
- /bin - This is where the system stores important executables, needed for the startup of the system.
- /boot - The kernel is often placed here, together with some other boot files, this directory should be on the first 1024 cylinders of the disk, or the disk should be LBA translated, otherwise LILO can't boot the kernel.
- /dev - This is a really interesting directory :). In there, every device on your computer (serial ports, hard disks etc..) has a file, a device file.
- /etc - Global configuration files.
- /home - Users's home directories, every user has a directory in this directory.
- /lib - Shared libraries, important for the system startup. Share libraries are used by many executables at the same time, saving memory and diskspace.
- /lost+found - If you run a fsck, and it finds some weirdness, the result goes here.
- /mnt - This is non-standard, but common directory. It exist there for temporary mounts (e.g cdrom or floppy).
- /proc - This is a really important directory. It exists only as a mount point on the harddisk, the rest is virtual information filled in by the kernel. Here you find information about all your processes, and other information such as which interupts and memory addresses are in use. An easy way to fetch that information, it's just files, as the rest of the UNIX system.
- /root - This is the home directory of the root user.
- /sbin - Executables the root needs to use, that should be availiable at boot.
- /tmp - Temporary files. Everybody can write here, but only the owner of the file may remove the file. Root may do it too, of course.
- /usr - This directory has a lot of subdirs. /usr/bin has the same type of programs in it as /bin, but they aren't that essential for the system to work. One subdir of /usr is /usr/local, also having a bin and sbin and lib directory. In local you can place local extensions of the system, and if you upgrade your system the upgrade shouldn't do anything about local, so your changes will still be there.
- /var - var stands for Variable. This directory holds files that could be a lot bigger in a short time, and get smaller really fast too. Typical examples are mail and news spools.
Start apache webserver
Using KDE, goto "Server Settings -> services" and start the httpd which is the apache webserver. You know it's working if you open a browser and go to http://127.0.0.1 from the linux box and you should get an apache default page. If that works try going to the servers IP address (in my case, http://10.0.0.5) from another computer in the network.
The webserver must have a static LAN IP. You can configure the network using the netconfig program (/usr/sbin/netconfig). Use the router IP as the gateway and name-server. Afterwards restart the network with /etc/rc.d/init.d/network restart. If you need more options in network configuration use the neat program.
Instead of using the apache default page, put your website content in the "/var/www/html" directory indexed by "index.html".
Get website accessible from the world wide web
Traffic coming to your router needs to be forwarded to the webserver. I had to do three things:
- Change the HTTP server port on the router to 8080 meaning that if I want to configure the router I have to go to http://10.0.0.2:8080. Otherwise traffic would by default be directed to the router configuration page rather than the webserver.
- Set up internet traffic connecting to the WAN side of the router to be forwarded to my webserver.
- The 1st way I did this was using the DMZ option on my router with the host being my webserver (10.0.0.5). A DeMilitarized Zone means that incoming traffic is forwarded straight to the webserver, so traffic isn't confused about which internal IP to go to.
- I later changed to using the "Virtual server" setting on my router to forward traffic on public port 80 to port 80 on the LAN webserver. This also acts as a firewall because each public port has to be mapped to a private port otherwise it is unusable from outside the LAN. (see setting up my router).
- Save and restart the router.
After doing that, make a note of your current WAN IP address, go to work and type it in a browser, you should get your website.
Getting a domain name: You don't want to have to type in a IP address to get to your website:
- Free solution: Get a account from www.cjb.net and your'll get a domain name such as "www.tomfotherby.cjb.net". Then you can forward traffic to your real IP address such as "http://217.44.186.130".
- Expensive solution: Buy a domain name such as "www.tomfotherby.com" from a registrar such as www.buydomains.com (see the full index of registrars at: http://www.internic.net). Your'll then be able to URL or frame forward to your IP address.
Problems:
- Your ISP will change your IP address every few weeks and your'll need to update your domain forwarding to the new WAN IP.
- If you use IP forwarding, the browser looking at your webside gets an ugly URL.
- Google can’t index your site because the URL it sees is likely to be an old IP address that has since been re-assigned by your ISP.
Solution to problem 1: Write a program to check you WAN IP for change and update your domain name forwarding if nesseccary.
- /home/tf98/bin/checkWANIP.pl gets the current WANIP and compares it with the latest one in a history file (IPhistory.txt). If there is a mismatch it records the new IP in IPhistory.txt and updates the forwarding address for www.tomfotherby.com at my registrar (www.buydomains.com)
- Write a script that will run this perl program.
#!/bin/sh -
perl /home/tf98/bin/checkWANIP.pl
and change the permissions of the script so it is executible: chmod a+x checkWANIP
- Put the script in /etc/cron.hourly so the script is run automatically every hour as a cron job. This doesn't actually fix the problem because my router doesn't re-connect after a IP-change until I switch it off and back on again and so the script fails whilst I'm offline (it's damn annoying!).
Solution to problems 2&3:
- If your registrar has a "Domain Listing Service" then you should use it instead of IP or URL forwarding so that your domain name is used rather than your IP address.
- The registrar with which the www.tomfotherby.com domain is registered will have added a entry into the whois database containing my domain name, my owner information and a domain name server. They will have a couple of default name-servers, but if we forward traffic to an IP address a name-server isn't used. We could set up our own name-server and use it. For more information read the www.diywebserver.com site.
- I think it might be possible to use apaches virtual hosts.
More on name-servers: When you type a URL into your browser, the browser's first step is to convert the domain name and host name into an IP address so that the browser can go request a Web page from the machine at that IP address. To do this conversion, the browser has a conversation with a name server.
When you set up your machine on the Internet, you (or the software that you installed to connect to your ISP) had to tell your machine what name server it should use for converting domain names to IP addresses. On some systems, the DNS is dynamically fed to the machine when you connect to the ISP, and on other machines it is hard-wired. If you are working on a Windows 95/98/ME machine, you can view your current name server with the command WINIPCFG or IPCONFIG, or on a UNIX machine, type nslookup, dig or host along with your machine name (which can be found using the hostname command).
|
| Configuring the webserver |
|---|
Making yourself at home
The Basics:
Making your Linux box file system accessible on the network
You can do this fairly easily by running a Samba server on the linux box.
Step One
First edit your smb.conf file. Mine is at /etc/samba (do whereis samba). To understand the smb.conf file see the manual page (man smb.conf). This is a quick and dirty smb.conf file that worked for me:
[global]
; A special section that sets up global variables used in all other sections
; %m is the NetBIOS name of the client machine.
encrypt passwords = yes
guest account = smbguest
log file = /var/log/samba/%m.log
netbios name = LINUXBOX
security = share
socket options = TCP_NODELAY IPTOS_LOWDELAY SO_RCVBUF=8192 SO_SNDBUF=8192
workgroup = KIXNTOM

[linuxBox]
; Defines a file space share called "linuxBox", using the priviledges of smbguest.
comment = linux box file system
browseable = yes
guest ok = yes
guest only = yes
read only = yes
path = /

# This one is useful for people to share files
[tmp]
comment = Temporary file space
browseable = yes
guest ok = yes
guest only = yes
read only = no
create mode = 0666
directory mode = 0777
path = /tmp
|
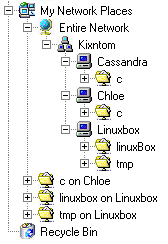
The smb.conf file is split into sections which are defined with angle brackets e.g. [shareName]. There are three special share names ([global], [homes] and [printers]) but any other share name denotes a particular shared view of the file system.
| View from windows | smb.conf sections |
|---|
|
[Global] defines the global variables used throughout the smb.conf file. The netBIOS name is equivalent to the "computer name" in windows. Make sure the workgroup name is the same as what you used in the windows computers.
[linuxBox] is a particular share of the linux box's files. This share gives smbguest read-only access to the linux box's file system which allows me to browse it from a windows box on the network.
[tmp] is another share of the linux box's files. This time it allows write access to /tmp. I use it to transfer files from windows to linux.
|
Step Two
When you view files on the linux box on the network from another machine you use the guest account, smbguest. This account needs to be set up on the linux box.
First setup a place to store the samba password:
     mkdir -p /usr/local/samba/private
     touch /usr/local/samba/private/smbpasswd
     touch /usr/local/samba/private/secrets.tdb
Next, add a dummy user to the system called smbguest:
     groupadd smbguest
     useradd -d /home/smbguest -g smbguest -s /bin/false -m smbguest
     mkdir -p /home/smbguest
     chmod 0700 /home/smbguest
Next, set the new users samba password and run the test script:
     smbpasswd -a smbguest
     testparm
Step Three
Start the samba server by going to the services user interface and starting smbd and nmbd daemons (or type "/etc/inet.d/samba restart").
Testing
That should be it, go to network neighbourhood in windows and see if you can see the linux box's files.
Problem: I can't use my "www.tomfotherby.com" URL inside my own network, but it'll work anywhere else on the internet.
Solution:I had to put the following line in the "/etc/hosts" file:
10.0.0.5 tomfotherby www.tomfotherby.com tomfotherby
- 10.0.0.5 = IPAddress
- tomfotherby = hostname
- www.tomfotherby.com is an Alias to the hostname.
After you are finished configuring your networking files, don't forget to restart your network for the changes to take effect (NOTE: network not webserver).
[root@hantaro] /# /etc/rc.d/init.d/network restart
|
| Setting up a private directory |
|---|
|
I was interested in setting up a restricted directory in the webserver which would be unavaliable to the public:
- Create a new directory the in the website: mkdir /var/www/html/safedir
- Create a new password file somewhere not accessible by the web using a special command:
# htpasswd -c /usr/local/apache/passwd/.htpasswd bob
New password: mypassword
Re-type new password: mypassword
Adding password for user bob
The -c flag creates the .htpasswd file and should only be used the first time, to add other users leave out the -c flag.
- Create a file in the directory-to-be-restricted called .htaccess containing the following text:
AuthName "Enter Password"
AuthType Basic
AuthUserFile /usr/local/apache/passwd/.htpasswd
require valid-user
- Set permissions:
- chmod 711 safedir
- chmod 711 /usr/local/apache/passwd/
- chmod 644 /usr/local/apache/passwd/.htpasswd
- chmod 644 safedir/.htaccess
That was supposed to be it but no pop-up password box appeared, something was wrong.
Solution: I had to play around with Apache's configuration file. I only got it working after I added this to /etc/httpd/conf/httpd.conf:
<Directory "/var/www/html/safedir">
  AllowOverride AuthConfig
</Directory>
|
| Writeing my first CGI script |
|---|
|
In the apache configuration file (/etc/httpd/conf/httpd.conf) there is a variable called "ScriptAlias" which gives a directory such as /var/www/cgi-bin where perl code is permitted to run by the webserver.
ScriptAlias /myScripts/ "/var/www/html/cgi-bin/"
I put the following code in a file called "something.cgi" in the ScriptAlias directory.
#!/usr/bin/perl

print "Content-type: text/html\n\n";

while (($key, $val) = each %ENV) {
  print $key." = ".$val."<br>\n";
}
It didn't work to start with (I got a "Premature end of script headers" error) for three reasons:
- The "Content-type: text/html\n\n" line must have the "\n\n" at the end.
- File permissions: chmod 755 something.cgi.
- The first line of the script must be where perl is (e.g. #!/usr/bin/perl got from whereis perl.
So now I have the tools to write CGI scripts. One more things though. How do I install other perl modules?
Install via CPAN module
The CPAN module is a module that usually comes bundled with perl and provides an interface with CPAN itself
(Comprehensive Perl Archive Network)
Using the CPAN module you can download, make, and install the modules with one command. To start the CPAN shell, become root or superuser on your server and type the following from the command line: perl -MCPAN -e'shell'.
Some configuration needs to be done before you can start using it - you get a choice of manual or automatic configuration (automatic worked for me). Example of use:
- Become root
- perl -MCPAN -e'shell'
- type "install LWP"
- Press enter for each question.
|
| Increase the power of the webserver |
|---|
|
I'm going to try to use PHP to let the webserver access a Postgres Database.
PHP
PostGres
- Install Postgres as part of the Linux install process or otherwise.
- See where Postgres is installed: whereis postgres
- Start Postgres running using the Services GUI application to start the postgreSQL backend daemon.
- Set yourself and the webserver up to access PostgreSQL:
- Find out what user name the webserver runs as: ps -aux | grep http
- Become root: su -
- Become the postgres user: su postgres
- Create tf98 as a postgres user: createuser tf98 - allow create db's and add new users
- Create apache as a postgres user: createuser apache - allow create dbs but not add new users.
- Exit back to yourself: exit,exit
- Create a database called friends: createdb friends
- Check the new database exists: psql -l
- Create a file called "input" containing:
CREATE TABLE friends (id serial, firstname char(10), surname char (10));
INSERT INTO friends values (nextval ('friends_id_seq'), 'Test', 'User');
INSERT INTO friends values (nextval ('friends_id_seq'), 'Your', 'Name');
- Run the input file to populate the database with a table called "friends": psql -d friends -f input
- Create a file called testPostGres.php somewhere in the webservers file structure that contains:
<html>
<body>
<?php
$db = pg_connect("dbname=friends");
$query = "SELECT * FROM friends";
$result = pg_exec($db, $query);
if (!$result) {printf ("ERROR"); exit;}
$row = pg_fetch_row ($result,0);
printf ("ID : %s<br>\n", $row[0]);
printf ("First Name: %s<br>\n", $row[1]);
printf ("Surname   : %s<br>\n", $row[2]);
pg_close();
?>
</body>
</html>
- Grant the webserver access to the friend Database:
- Open the command line interface to postgreSQL "friends" database: psql friends
- See a list of tables in this database: \d
- Don't get confused that the database is called "friends" and there is a table called "friends".
- Grant access to the "friends" table to apache: GRANT all ON friends TO apache;
- Quit out: \q
- Browse to the file and check that the webserver can use PHP to access a postgreSQL database!
|
| Webalizer |
|---|
|
Webalizer is a program that analyses webserver logs and produces statistics in a usage directory. My apache logfile is kept at "/var/log/httpd/access_log" and is in the "CLF" (Combined Log Format) standard. My system seems to do some log rotation that periodically produces access_log.1, access_log.2 etc.
|
The webalizer program generates a current statistics file ("index.html") that indexes a HTML file for each month. The webalizer program has a configuration file kept at "/etc/webalizer.conf".
|

|
|
| Reduce the noise of the webserver |
|---|
|
Noise is a problem because the webserver is always on and might disturb the peace. Tackleing the problem:
- The CD rom drive - Take any CD out, problem solved (wish everything was that easy).
- The CPU fan - OK this is an old machine worth about 5 pounds. I took the CPU fan off and everything was fine (Note: I still have a case fan).
- The Power Supply unit - This isn't too noisey, I can cope with it.
- The hard disk - big problem, I want to buy a specially quiet hard disk such as the "seagate barracuda V", 60GB for $86 isn't bad.
A good place to start is www.quietpc.com
|
| Adding an aditional hard drive to Linux (Jan 2004) |
|---|
|
To find out how full your disk is, type: df -h. To find out how much space a particular directory is taking up, type: du -sh OurMusic/. Heck, I need more disk space...
The Webserver machine has 2 IDE interfaces on the motherboard and each ribbon cable coming out of a interface has two plugs (one in the middle and one at the end) with which to connect into a max 4 IDE devices such as hard disks, cdroms and zip drives. When IDE devices share a ribbon cable, one must be a master and the other a slave (achieved via jumper settings).
- Before adding the second hard disk:
- I physically connected a second-hand 7GB hard disk as the slave to the existing 2 GB hard drive.
- # ls /proc/ide now shows "drivers hda hdb hdc ide0/ ide1/ piix"
hdb is my newly added harddrive.
- My newly added harddrive is from an old windows machine and the interesting thing is that I can mount it and see the old files it contains:
- The new hard disk must be partitioned, formatted and finally mounted automatically at startup. See: http://www.linuxplanet.com/linuxplanet/tutorials/4232/4
I havn't really done what I wanted. I don't want to mount an extra disk on the filesystem, I just want to use the new disk so that my existing filesystem can grow bigger. I guess I have to re-partition my existing filesystem to span both my old hard drive and my new hard drive ...
|
| Remotely accessing my webserver (April 2004) |
|---|
|
I wanted to remotely access my Linux webserver from a windows machine in my network. I guessed I had to start a telnet or ssh daemon. netstat -tap shows what servers are currently listening. I went to the redhat services GUI and started "sshd" (I couldn't find a telnet service). Then I downloaded Putty for windows and connected to 10.0.05 (my LAN webserver IP address). Worked fine.
Things seemed OK until I tried to use emacs and the text was weird to edit. I fixed the problem by using the UTF-8 character set in the "Translation" setting in PUTTY ("Received data assumed to be in which character set:"). A quick test to see if you have the correct character set is to look at the man page for ssh for "äa" instead of "-a" in the command line options.
|
| Moving distrubition from Redhat to Debian Woody (November 2004) |
|---|
|
I had a powercut and my redhat server got trashed. I decided it was time to try out a different distro and debian seems the most interesting.
- I decided my old server (a P200 with 64MB RAM and a 4GB harddisk) needed improving. So, I wanted to dual-boot my P4 1.4GHZ with Linux so it could be my web-server except when I want to play "the sims" when I can boot it into windoze.
- I downloaded the "debian sarge network install pre-rc2" which allowed me to resize my Win XP NTFS partition and dual-boot a simple version of debian.
- I started to learn how to use "aptitude" and "apt-get" to install the things I needed. First off was KDE, 2nd was mozilla, 3rd was apache.
- The middle-mouse button didn't work. I edited the /etc/X11/XF86Config-4 so that the 1st mention of mouse "InputDevice" was configured to Option "Protocol" "ImPS/2" and Option "Emulate3Buttons" "false"
- In Mozilla, middle-click didn't close a tab. Type "about:config" in the URL field, and then in the Filter field type 'middlemouse.contentLoadURL'. Double click this Preference and then type in 'false'. Now, if you middle click a tab, it will close.
Installing a wikiwiki section of my website
- I simply ran "apt-get install moin" to install moinmoin wikiwiki into all the sensible places of the filesystem. The following directories were automatically created:
    /usr/share/moin
    /usr/share/moin/cgi-bin
    /usr/share/moin/data
    /usr/share/moin/htdocs
- Moinmoin uses python. I checked Python was installed by typing "Python -V" (answer I got was "Python 2.3.4").
- Next, I had to create "an instance" of the wiki. I decided to call my instance "mywiki" and put it in my webserver directory which is password protected. First, I found out the username of the webserver by typing "ps -aux", answer was "www-data". These were the commands needed:
cd /var/www/html/safedir/
mkdir mywiki
cp -r /usr/share/moin/data mywiki
cp /usr/share/moin/cgi-bin/* mywiki
chown -R www-data.www-data mywiki
chmod a+rx mywiki/*.cgi
- Then, I appended this line to the apache config file ("/etc/apache/httpd.conf"):
Alias /wiki/ "/usr/share/moin/htdocs/"
- I restarted the Apache server (usually "/etc/init.d/apache restart") and tried to access my new-born wiki with the URL "http://127.0.0.1/safedir/mywiki/". I got a permissions error.
- I added "Options +ExecCGI" to the safedir part of the apache config file:
<Directory "/var/www/html/safedir">
    AllowOverride AuthConfig
    Options +ExecCGI
</Directory>
I saw the FrontPage, and successfully edited and saved it.
- Finally, I edited "moin_config.py" to change "sitename" and "logo_url" to some personal values:
sitename = 'My Wiki'
logo_url = '/images/mywiki-logo.gif'
allowed_actions = ['DeletePage', 'AttachFile']
- Today (14th Dec 2004) moinmoin started hanging after I click on edit. I found out that it goes online to fetch a blacklist from http://moinmaster.wikiwikiweb.de:8000/?action=xmlrpc2. Presently, this URL hangs in my browser, so it's a good guess it is also causing MoinMoin to hang.
The workaround is to edit your MoinMoin instance moin_config.py (on my setup: /var/www/html/safedir/mywiki/moin_config.py). Note this file is a copy from the original (/usr/share/moin/cgi-bin/moin_config.py), so I'll have to be careful I don't get bitten if I create another instance.
Just comment out this line:
from MoinMoin.util.antispam import SecurityPolicy
My backup script
I have a spare harddisk in the webserver machine which I use to store backups. This is the script I have put in /etc/cron.daily/:
#!/bin/bash

mount /dev/hdb1 /media/2ndHD

tar -czvf /media/2ndHD/hantarioBackup/today_webSiteBK.tar /var/www/html
rm /media/2ndHD/hantarioBackup/????????_webSiteBK.tar

date=`date +%Y%m%d`
mv /media/2ndHD/hantarioBackup/today_webSiteBK.tar /media/2ndHD/hantarioBackup/$date\_webSiteBK.tar

umount /media/2ndHD
|
| Installing Squeezebox and Wi-Fi (Jan 2005) |
|---|
|
For Christmas I got Linksys Wireless Router (WRT54G) which came pre-configured with an IP address of 192.168.1.1. My current network IP addresses were 10.0.0.x and so I had to move to a class C network.
To change the IP address of a computer in Linux I had to edit the following 3 files:
- /etc/resolv.conf
- /etc/hosts
- /etc/network/interfaces
The wi-fi router needed configuring via it's web interface. The main setting is the SSID which we set to "WKIXNTOM".
To install the Squeezebox I downloaded the zip file that contains the perl source code, unpacked it to a directory (/usr/share/SlimServer_v5.4.0) and then ran "slimserver.pl --daemon". After the daemon starts it is accessible via a webbrowser at "http://127.0.0.1:9000/".
Our network consists of the following devices:
- Modem/Router/Switch: 192.168.0.1
- Webserver (hantario): 192.168.0.2
- Kix's Machine (bob): 192.168.0.3
- Xbox: 192.168.0.4
- Wireless Access point/switch: 192.168.0.5
- Squeezebox: 192.168.0.6-10 (The router is running a DCHP server with a pool of addresses between 192.168.0.6-10).
Our network has a subnet mask of 255.255.255.0
|
| Installing Debian Sarge (Jan 2004) |
|---|
|
I downloaded the Debian testing distribution (Sarge). I only needed to download and burn the first disk out of 10 or so. The installation process was pretty tricky and required detailed knowledge about my hardware. For example, I had to known my video-card was a nVidia GeForce2 MX with 32768 of memory and my monitor is called "NSV1107K" (I got some of the needed information by booting into Windows). X-Windows failed to run and I had to learn how to edit the XF86Config-4 file to sort a problem out with my monitor/video card. There is a front-end to the file called "XF86Config" and another called "dpkg-reconfigure xserver-xfree86". "startx" is the command to start X and "Ctrl-Alt-Backspace" stops X. Even after X started my screen resolution was tricky to get right. I just kept hacking around with the "/etc/X11/XF86Config-4" file, and things suddenly started working. I added various resolutions and used "backspace" to restart X. e.g:
Modes "1280x1024" "1152x864" "1152x768" "1024x768" "800x600" "640x480"
I found I had to add the resolutions to all depths, not just 24 bits.
The main learning curve for Sarge over Woody has been using apache2 rather than apache. The old "httpd.conf" file has been replaced by "apache2.conf" and a file called "000-default" in "/etc/apache2/sites-enabled/". I like the new approach, it's so easy to install extra modules. e.g.
This is how to set up php4 for apache2:
- Check php isn't already installed: "php -v"
- apt-get install php4
- apt-get install libapache2-mod-php4
- /etc/init.d/apache2 restart
This is how to set up Python for apache2:
- Check python is already installed: "python -V"
- apt-get install libapache2-mod-python2.3
- /etc/init.d/apache2 restart
I wanted to install some todo software called ackerTodo.
This is how to set up MySQL for apache2:
- apt-get install mysql-server
- apt-get install php4-mysql
- Check installed ok:
- mysql -V = "mysql Ver 12.22 Distrib 4.0.22, for pc-linux (i386)"
- Notes:
- You have to log into mysql using a username (completely different from the unix user accounts). Enter "mysql -u username" to log into mysql with a user account (if you don't use "-u" you will log in anonymous).
- By default only "root" has permissions to create/edit databases. To log in as root, use "mysql -u root".
- By default the password for "root" is blank (i.e. no password).
phpmyadmin is a brilliant web-based database administration program that is a must-have:
- apt-get install phpmyadmin
- mv /var/www/phpmyadmin /var/www/html/
- Browse to http://192.168.0.2/phpmyadmin. Log in as root without a password. Have a look around to understand the structure of things.
This is how to set up ackerTodo:
- Downloaded ackerTodo-1.58.tar.gz
- unpacked it: tar -xzf ackerTodo-1.58.tar.gz
- copied source directory to website: cp -a src /var/www/html/todo
- Set permissions: chmod -R a+x todo
- Edited "/var/www/html/todo/config/config.inc.php". Changed host to "localhost", user to "root" and blanked out password.
- Went to http://192.168.0.2/todo/setup/setup.php
- Got this error: "Call to undefined function: mysql_connect()"
- I uncommented "extension=mysql.so" in /etc/php4/apache2/php.ini
- I later added a password for root in MySql. So I changed $pass in "config.inc.php" but replaced the "" with '' so the special characters in the password were understood.
Assigning root a password in MySql
Not having a password for your database is pretty stupid. This is how to set up a password for root
- mysql -u root
- update mysql.user set Password=PASSWORD('your_new_root_password') where User='root' and Host='localhost';
- flush privileges;
- quit;
|
|